How to Give Your Popcorn Ceilings the Boot
July 12th, 2022 | by Elizabeth| Posted in Before and Afters, design, remodelingWe’ve all seen them. We’ve all probably had them. Popcorn ceilings. Around Wilson County, they were a ‘70s and ‘80s thing, and I still see them all the time. Many will have glitter or sparkles in the finish, which especially dates it! Y’all can thank the ‘70s for that one.
Then in the ‘90s we saw more “stomped” ceilings around, where they took the mud and stomped the ceiling with a pattern using a brush. Still bad, but not as bad as popcorn. At least we’re learning, right? Lol.
So what can you do if these features are part of your current home? Yep, we’re going to talk about it. And in case you missed the other hits in our “out-with-the-old” series, you can find them here:
- Replacing that old, unused Jacuzzi tub
- Refinishing outdated cabinetry
- Lowering a raised bar in the kitchen

Step 1: Inspect those ceilings!
Ceilings of the ‘70s weren’t made like they are now. In fact, some of the older popcorn ceilings have harmful asbestos in them. Fortunately, the US Government banned the use of asbestos in ceiling finishes in 1977, so anything built or painted after that is generally safe. But it’s always best to be safe. If you are unsure about the ceiling age, you can scrape a small part off, seal it in a baggie, and take it to an EPA accredited lab for testing.
Either way, it’s always best to call a professional to inspect your ceilings before taking any action. They help you understand what you’re working with and discuss your best options for updating them. Which brings us to the two options I have for y’all today…
Option 1: Remove the popcorn texture.
Sounds simple, right? Like most home projects, looks can be deceiving. Removing popcorn ceilings is easy, but MESSY. You’ll have to spray the ceiling with water and start scraping. If you’re doing this yourself, I highly recommend wearing a mask and safety goggles. Even if your ceiling is asbestos-free, you don’t want to ingest those particles.
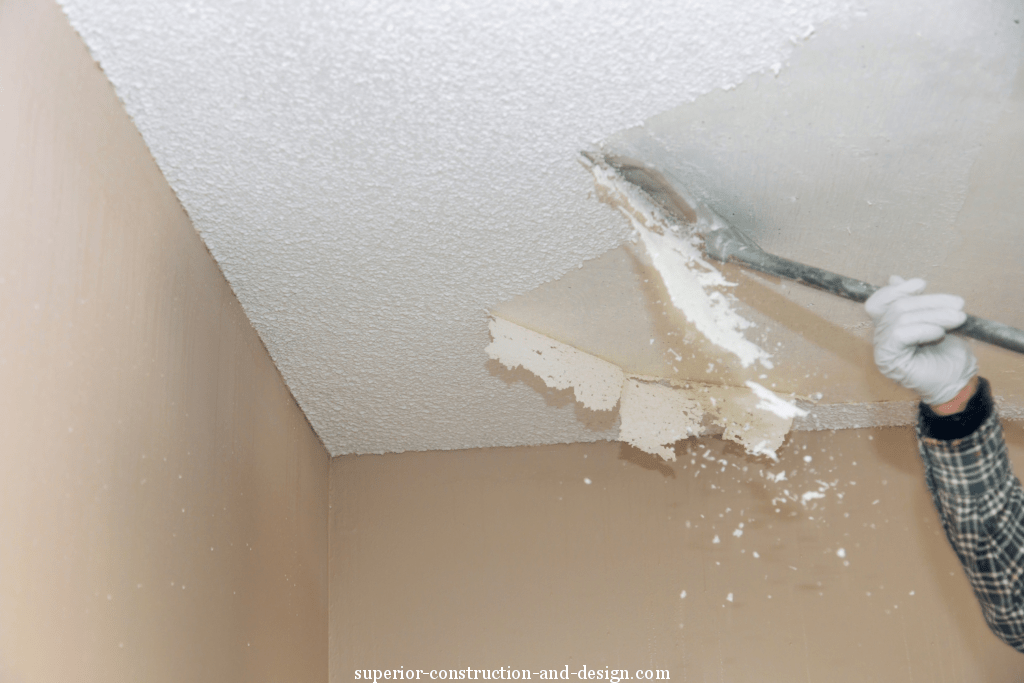
In an ideal world, bringing in a pro will save you the learning curve, the headache, and the task of cleaning up the mess yourself. Then, once the popcorn part of the ceiling is gone, there will also be plenty of drywall finishing to do. Again, an expert can do this for you.
Option 2: Cover those popcorn ceilings up.
The second option is more of an “out of sight, out of mind” approach. Instead of removing the popcorn texture, y’all can simply cover them up and pretend they were never there. Ignorance is bliss. There are several ways you can do this:
- Add ceiling tiles
- Hang millwork over it, like a beadboard or coffered look

If you aren’t sure which route to take, booking a consultation with a designer is a great way to get some creative solutions that work for your particular home and your sense of style. They’ll probably also know the right professionals to do the work for you, giving you an easy intro to someone talented and trustworthy.
And that’s it! One decade-defining feature, along with a few ways y’all can update it for a fresh look. Even if you love traditional style, having a smoother, cleaner-looking ceiling in your home will help it feel new.
Have any questions? Need some professional guidance? Book a call with me here, and I’d be happy (as always) to chat with you. Talk soon, y’all!
xo,
E