1970s Ranch Renovation: Behind the Scenes
October 26th, 2020 | by Elizabeth | Posted in bedrooms, Before and Afters, built-ins, design, remodeling

When you think of a 1970s ranch, what comes to mind? Lots of walls? Dark woods and cramped spaces? Zero storage? All of the above?
If you answered, “All of the above,” you’d be right! The clients behind this 1970s ranch renovation presented us with dreams of addressing all of the above design dilemmas and more. While today’s post isn’t a Before & After (yet!), I want to show you a part of the process that most people don’t see…
…how we design for our clients’ goals well before we ever raise a sledgehammer, lift a paintbrush, or remove a single piece of linoleum. Come take a sneak peek…
Meet Our Clients & Their 1970s Ranch
Our clients are the lovely Mr. and Mrs. C and their 3 boys. Mrs. C heads a unit at a local hospital. Mr. C owns a demolition company. And the 3 boys, ages 10-14, are still in school (or as “in” school as this year’s modified schedule will allow).
Mr. and Mrs. C purchased their home 4 years ago. As you know by now, it is a typical 1970s ranch home with 3 bedrooms, 2 bathrooms, and a full basement. Mr. and Mrs. C and the boys live on the main floor, and Mr. C’s mama lives downstairs.
Now, ever since they purchased this home 4 years ago, Mrs. C has been saving up for a full-home renovation. This means that VERY few updates had been done to the home over the years, and Mrs. C has had plenty of time to consider what she and her family really want…
Design Goals
Most of our clients come to us with an idea for what they want. Mrs. C, on the other hand, provided us with pages and pages of detailed notes on how she wanted the home to function and what she wanted included. (I love a client who knows what they want!)
She shared examples of styles she liked, but ultimately gave us freedom to interpret her style and then design accordingly. So, we had to consider the home’s existing layout and structure, take the family’s needs into account, and then chart our path from Point A to Point B…
Honestly, design feels like a big, pretty puzzle most of the time, but it’s one I love figuring out!
This angle is looking from the dining room into the kitchen. What WAS the dining room will be the new laundry room.
Goal 1: Creating an Open Concept in a 1970s Ranch Home
1970s ranch homes are known for being small, closed off, and lacking storage. But one of Mrs. C’s biggest requests was that we create an open concept feel between the kitchen, living room, and dining area. In other words…
Let’s open. it. UP!
Of course, whenever we know that walls will be moving, we bring in our structural engineer to verify what we were moving (which was be the main load bearing wall of the house), and specify what we need to frame back in to make sure the roof is supported. Just a little important, right? 😉
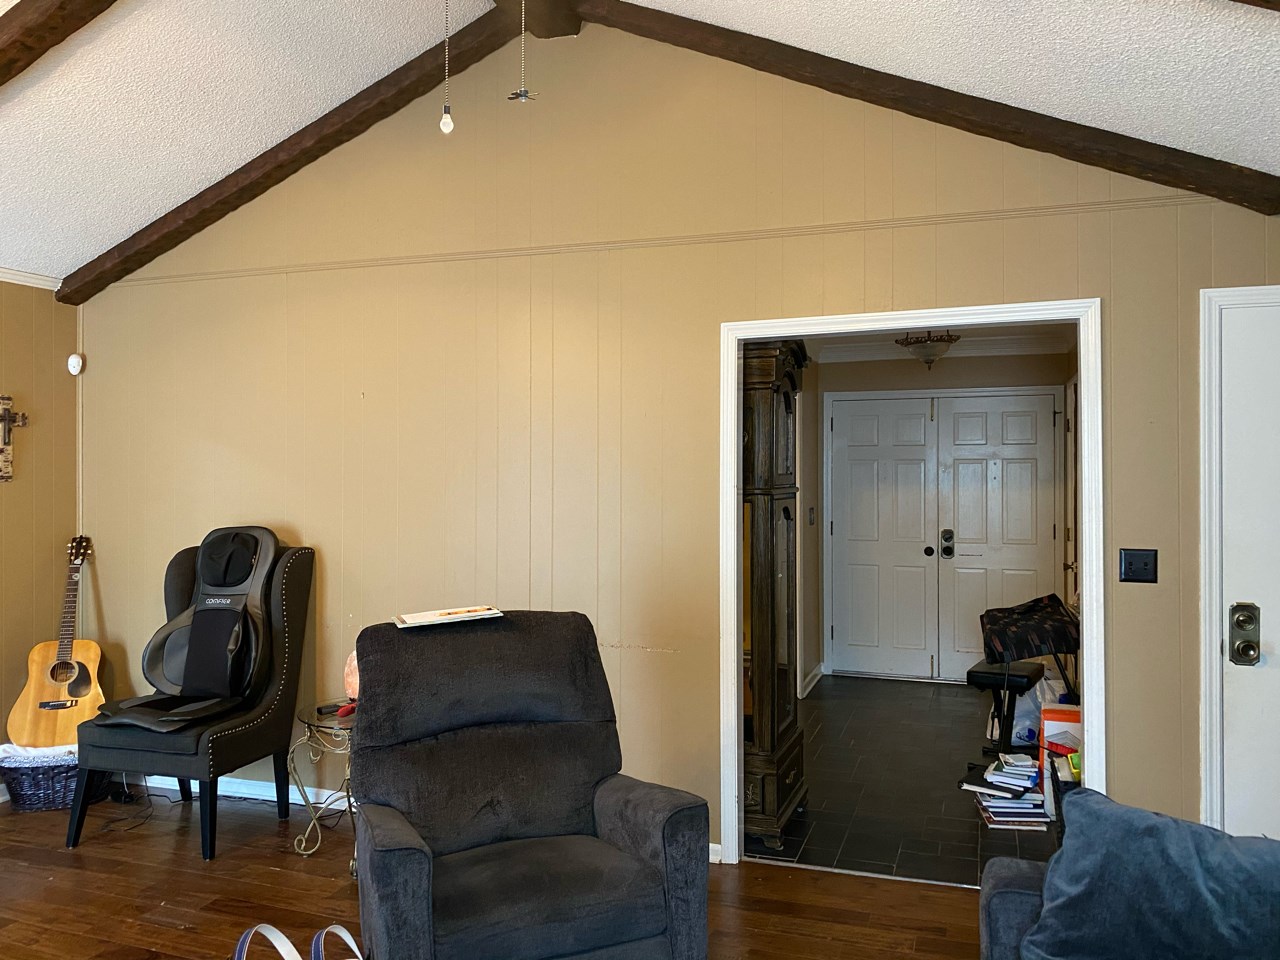
This is the load bearing wall we removed. This is a view from the back wall of the house, standing with our backs against the fireplace. It looks towards the entry and double front doors, which are being changed to a single door with sidelights. On the other side of that wall was the old living room, which is now the media/study/office space for the boys — as you’ll see soon!
Now, keep in mind that moving a load bearing wall and support elsewhere isn’t cheap. At one point, the engineer looked at me and said, “You can take half of this wall out and not have to do any additional support work in the basement.” That was music to my ears, because I thought, Mrs. C would love that! We’d get to reduce the investment on the things we can’t see, and have more to spend on the ‘pretty’ part.
I looked at Mrs. C, who had also heard the news, and said, “Oh that’s great!!” She looked at me, slowly turned around, and walked outside. I was a bit puzzled but kept talking through the logistics with the engineer.
A few minutes later, Mrs. C comes back in, looks at me, and quietly says, “I’m sorry, but that wall has to come down.” She almost had tears in her eyes as she told me that she had been dreaming of seeing that wall come down for 4 years and couldn’t bear only removing half of it.
I looked at her and said, “THE WALL IS GONE!!”
She reached over and hugged me and said, “I’m sorry, it’s just gotta go.” And that’s when I had to remind her that WE were the one working for HER. I feel it’s our job to present options where we can save funds, but at the end of the day, we will always do whatever our clients want!
And now the wall is gone. 😉 Here’s the open concept design we presented to Mr. and Mrs. C…
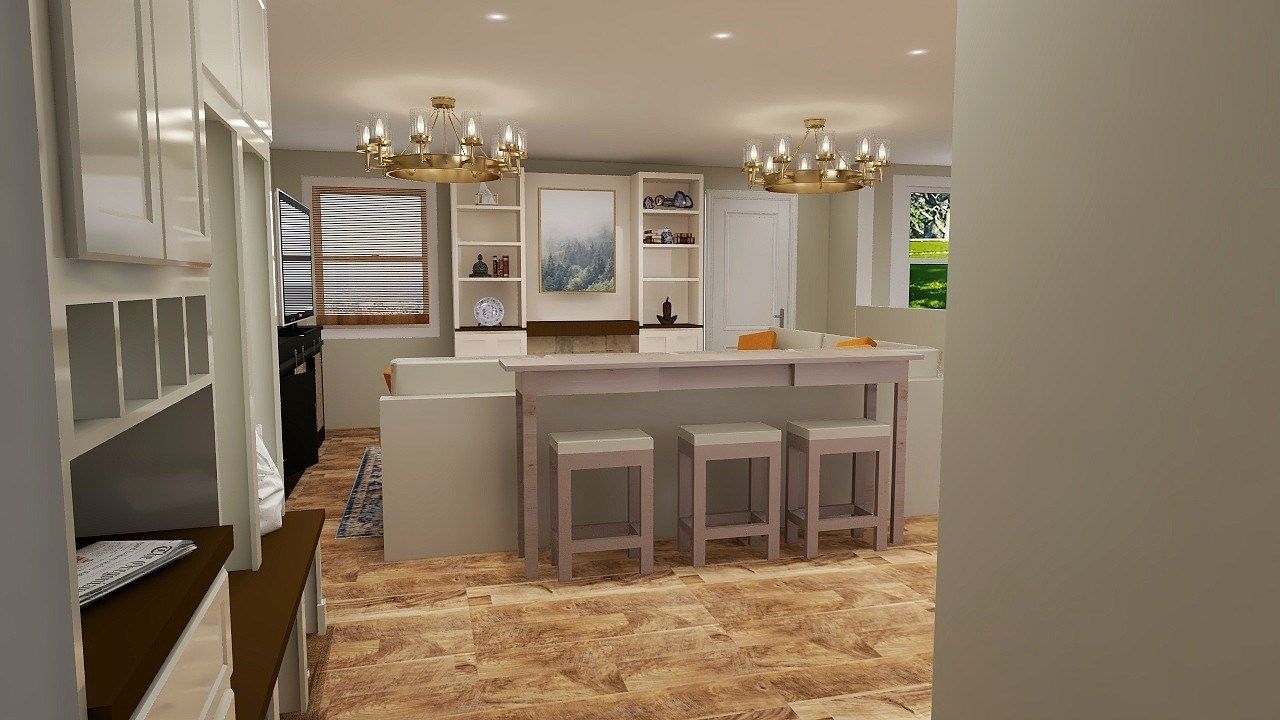
This whole entry space was previously behind that wall I showed you, right up to that sofa table in this rendering. Without the wall, it’s now open, bright, spacious and inviting for the whole family.
Here’s another angle that used to be blocked by that wall. The open space where I would be “standing” to see this view is now far more usable… but more on that in a bit.
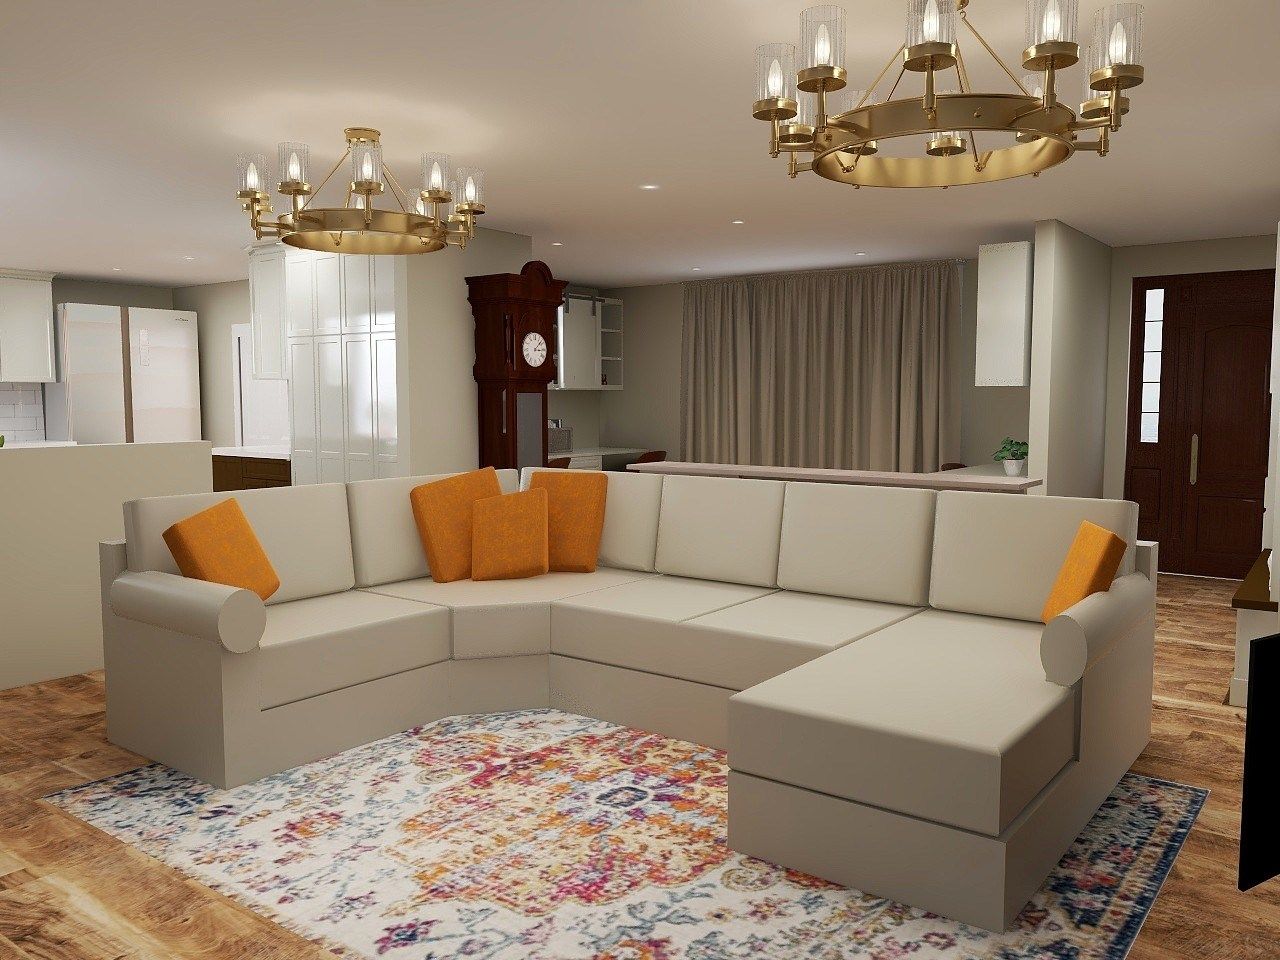
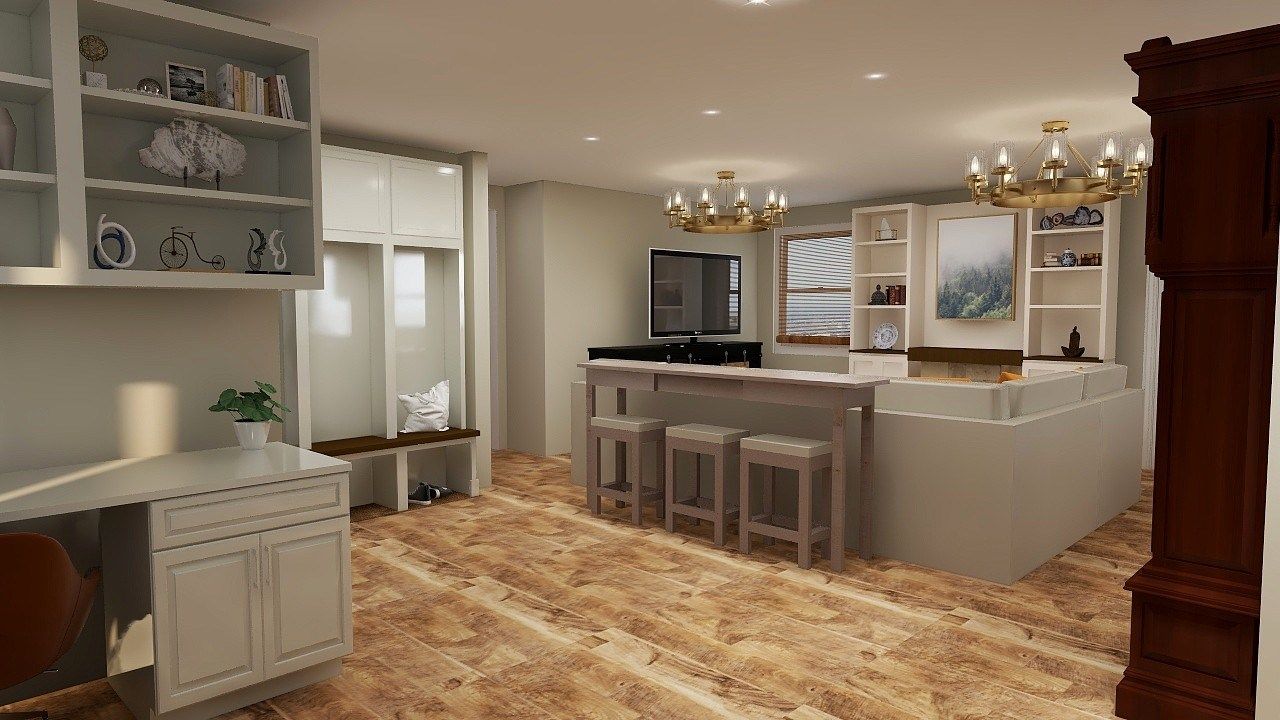
And the living room itself. With that wall missing, it’s truly an open concept space that’s a far cry from a traditional 1970s ranch home. It’s going to be beaut-i-ful.
Goal 2: Storage & A Social Kitchen
It was very important to Mrs. C that everyone be able to enjoy the same space and feel included in whatever is going on. This meant creating a kitchen layout that was social and open to the family room. Although the typical go-to in a kitchen is to add an island with seating, the shape of the home wasn’t quite right for this.
We decided to go in another direction, one that will be even comfier and cozier for the family, for guests, and for the home chef.
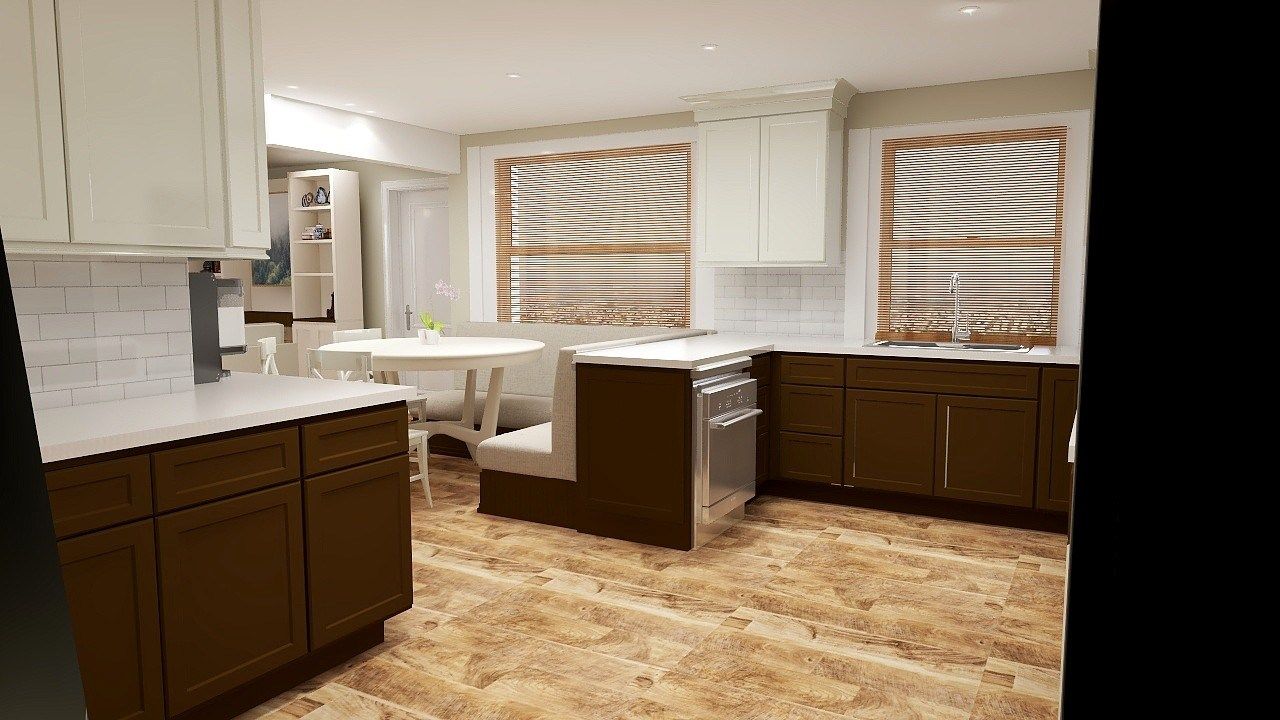
The kitchen is large, open, and has a built-in banquette right behind the peninsula. Perfect for serving the family, entertaining guests, or even using the table to work on tasks while keeping the cook company.
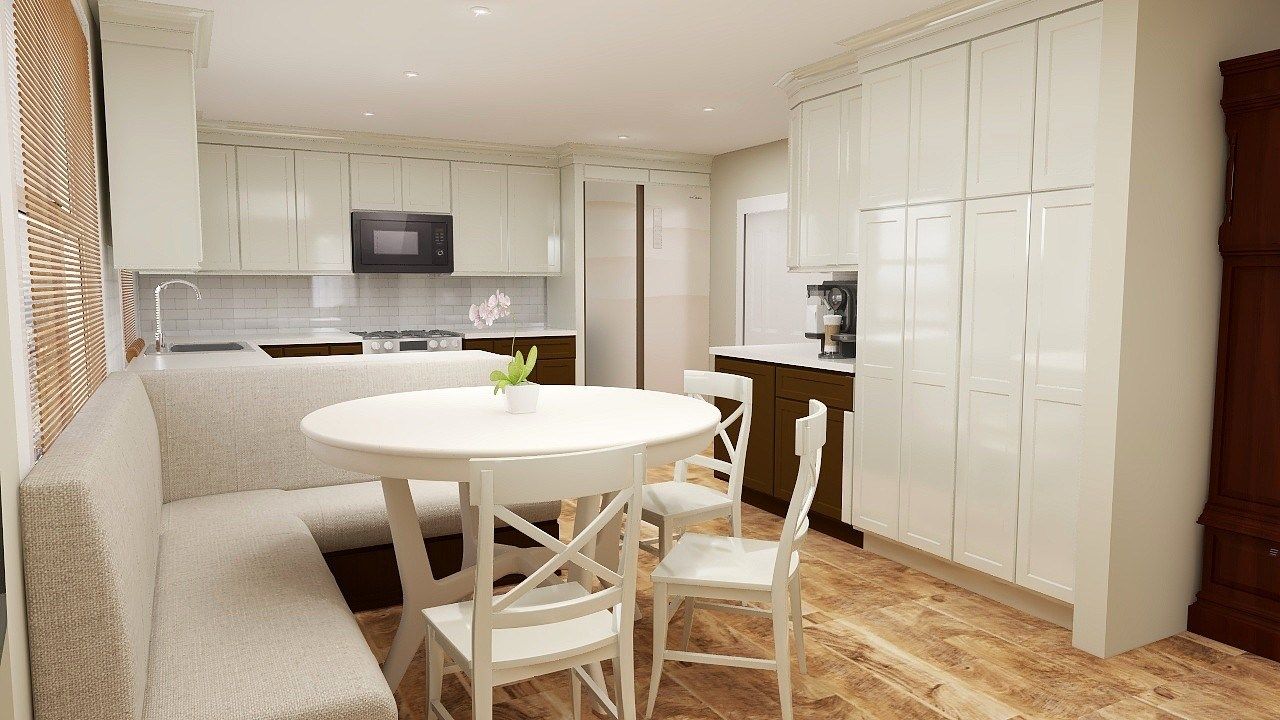
This side of the table opens up the family room, allowing the family to easily flow from one space to the next. We also added a TON of kitchen storage, because… 3 boys. They may just be hitting their teen years, but I foresee some big appetites coming to this home soon! 😉
Goal 3: At-Home Work Spaces
One of Mrs. C’s other big goals was for her 3 boys to have their own desks (hello, home school and a modified schedule) and a place for video games. We designed the front room of her home for just that with this built-in work space, storage space, and TV nook. (Remember when I shared this post about the limitless potential of built-ins?!)
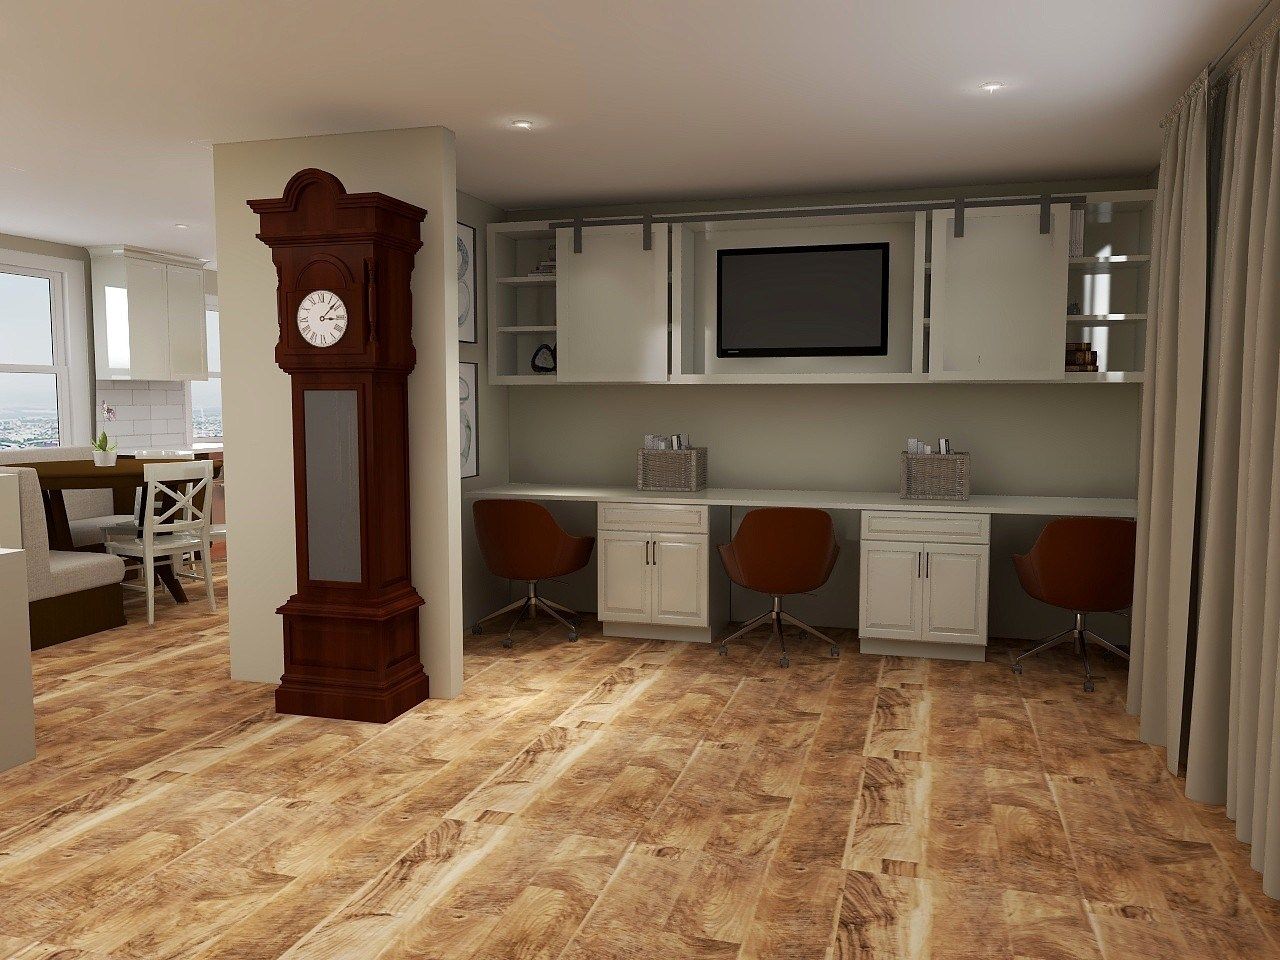
There it is! A full view of the space that was previously hidden by the wall. Mrs. C was right — it had to go!
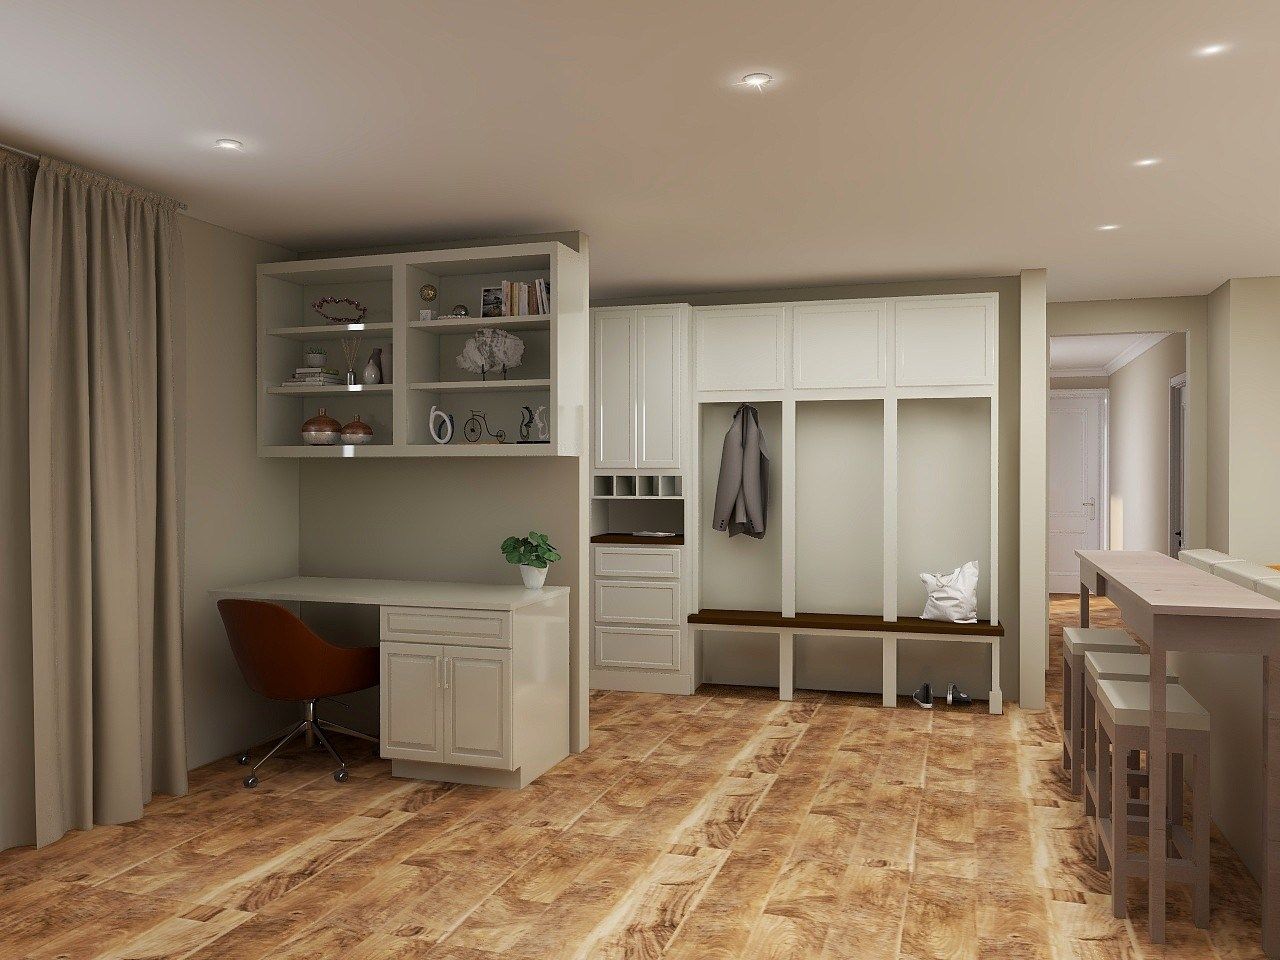
Directly behind the kids’ workspace is another desk area for either Mr. or Mrs. C to have their own work-from-home spaces whenever they need it. And I spy yet another built-in… this mudroom style entryway for coats and shoes!
Goal 4: Spaces for Running a Home Efficiently
Mr. and Mrs. C both work — and they have three boys — so running a home efficiently needed to be as easy as possible. Plus, their current washer/dryer units were located in the boys’ bathroom! Talk about inefficient.
When we reconfigured the home’s layout, we decided to design Mrs. C an entire ROOM for easy laundry and storage. Not only does this make laundry day far more exciting, but I know boys make lots of dirty clothes. Keeping them separate from other living spaces… well, I’m pretty sure it will make the rest of the home happier as well. 😉
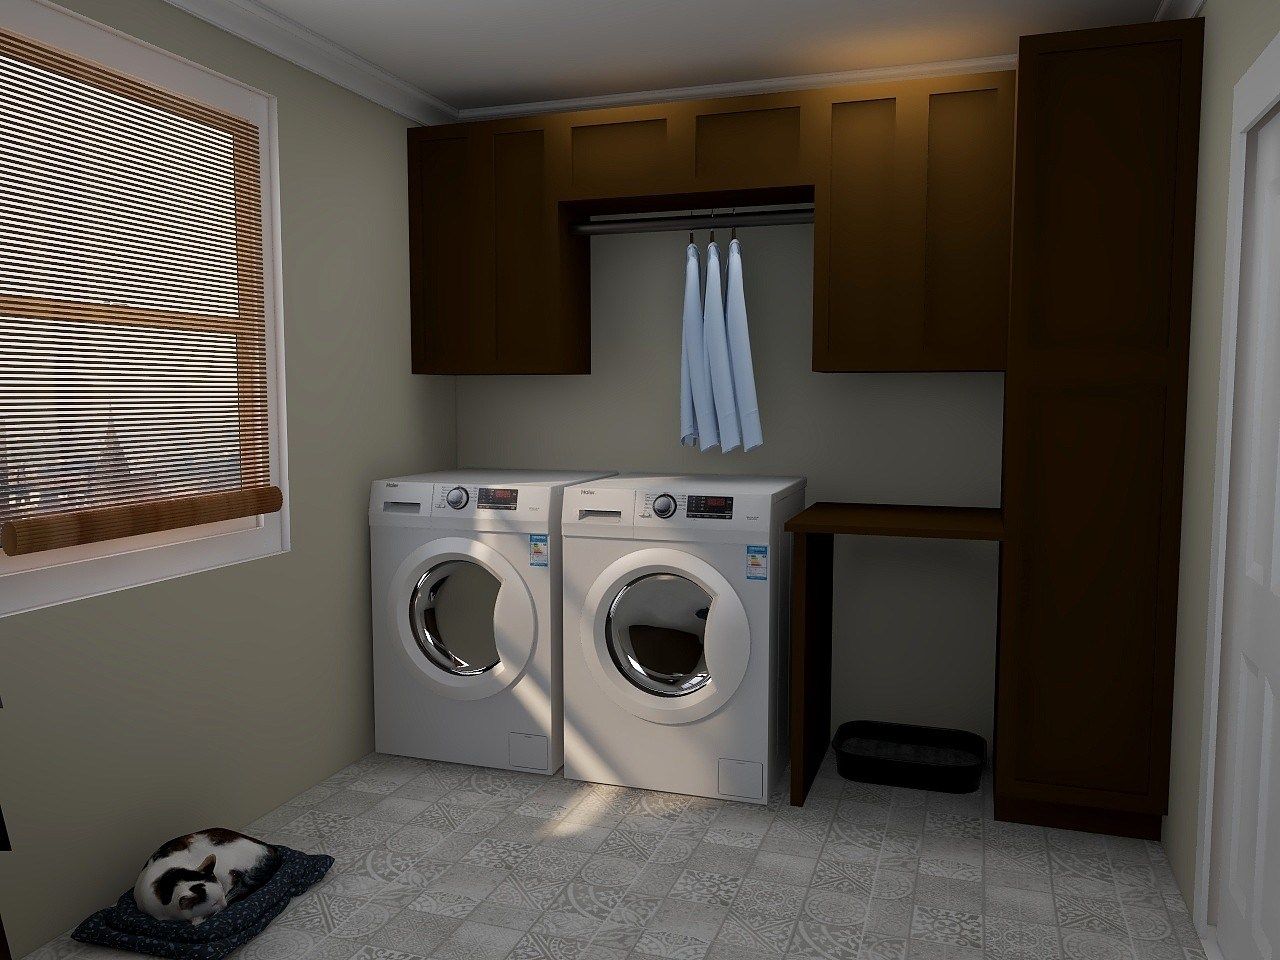
Notice there is a space designated for the kitty’s box — we always remember to design for the 4-legged members of the family, too. And this was a specific ask of Mrs. C’s as well.
Goal 5: Personalized Bedrooms
Mrs. C gave up her bathroom reno so her boys could have their rooms completed. Isn’t that just like a mama?! So precious. It was important for Mrs. C that the boys be involved in the process. We sat down and spent some time with each of them, and they told us what they wanted and didn’t want in their rooms. I can’t wait for them to see the final result!!
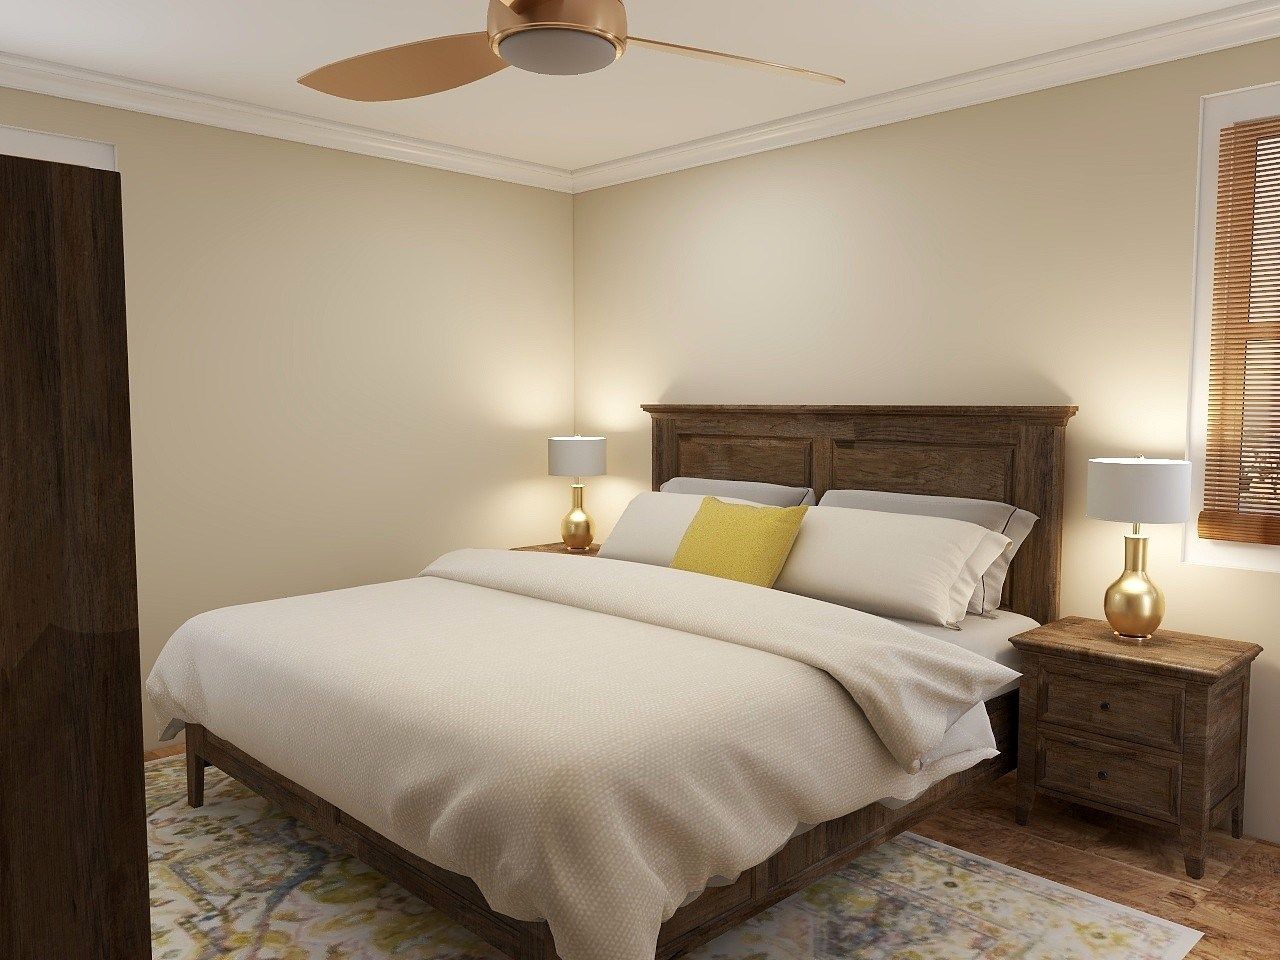
The master bedroom for Mr. and Mrs. C. A place that feels soft and soothing, warm and inviting, and has just a touch of sunny color.
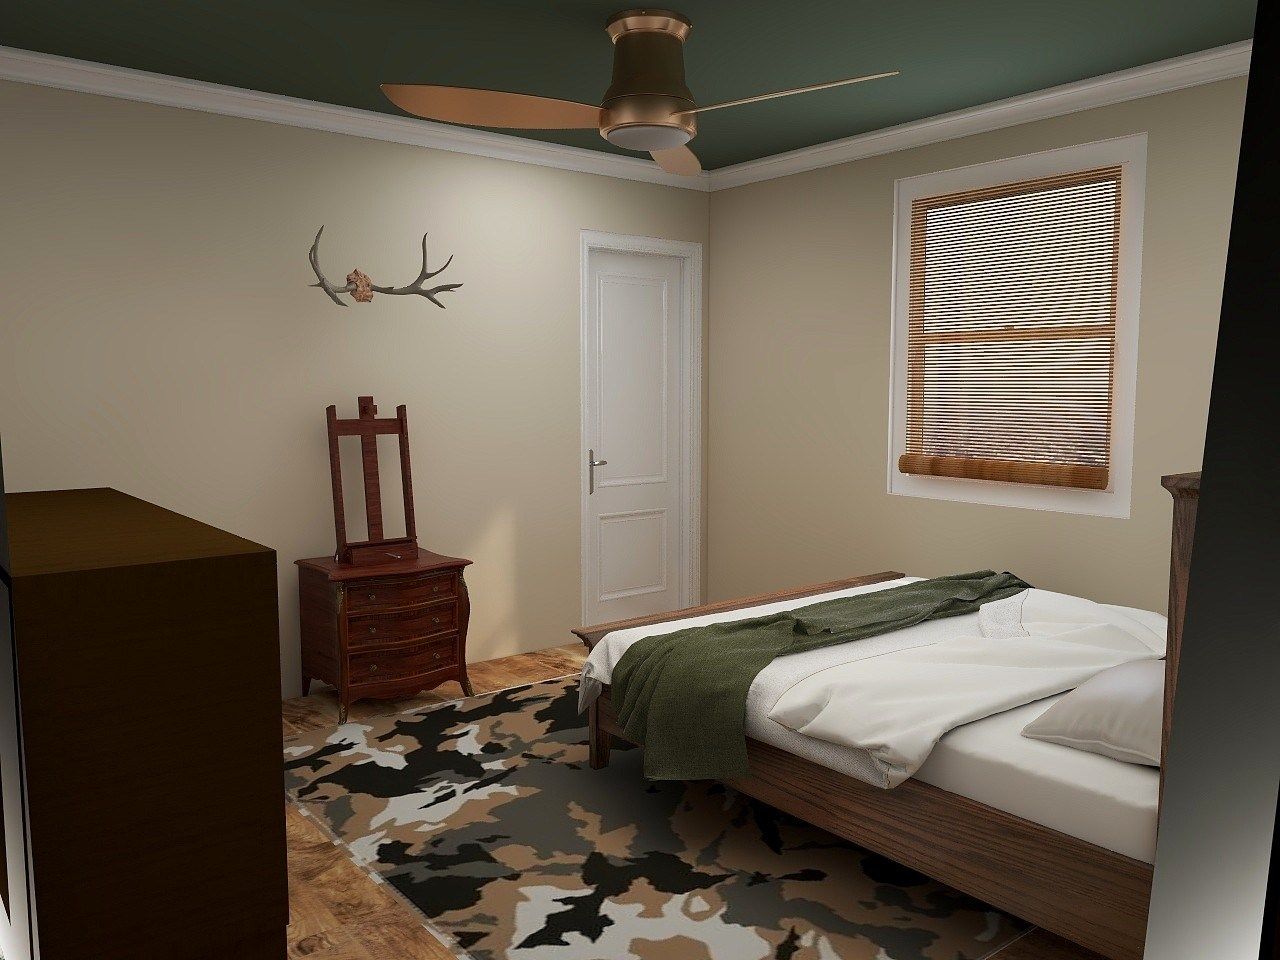
Their 14 year-old’s bedroom is going to be warm and woodsy! With deep natural hues and touches of his personality in the decor, this room is going to feel totally personal, but will match the look of the rest of the home, too!
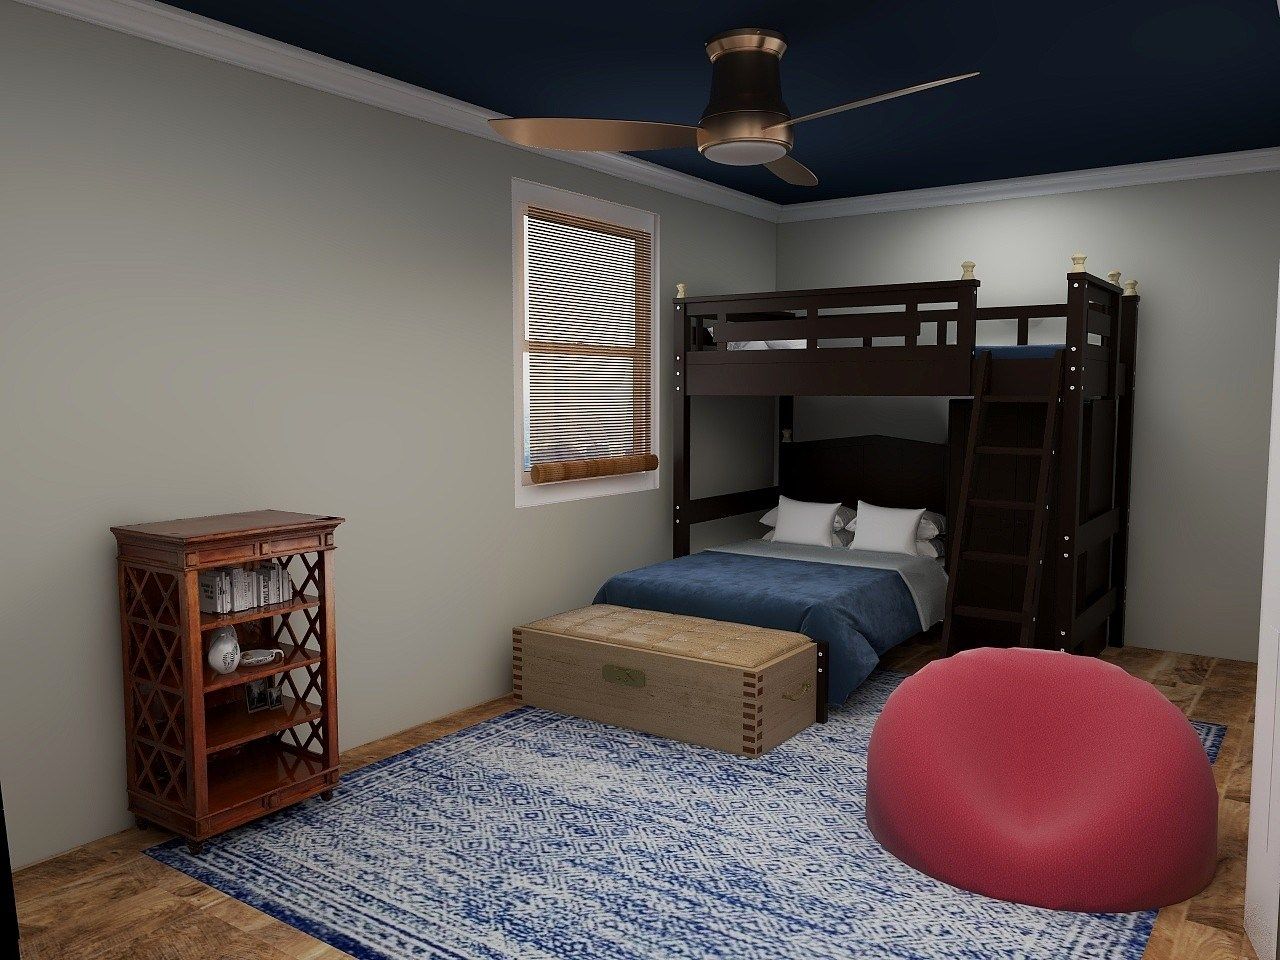
The 10 and 12 year-olds share this bedroom and both agreed that they love blue! With bunk beds, a ladder, a bean bag, and plenty of room for activities, I have a feeling this room is about to become the fun zone!
And What About Mr. C?
I’ve not mentioned much about his wants so far- because he had only one.
Out of the entire renovation (and it’s extensive), the only thing he asked for was a plumbed in coffee maker.
He has been quietly going along, not saying much of anything, except “whatever she wants.”
Needless to say we’ve plumbed in that coffee maker, and SO very happy to do so. We can’t wait to set up an entire coffee bar just for him!
In his own words, “if mama’s happy, then everyone’s happy!”
What’s Up Next?
We are currently bringing this home to life for our clients, which means that the official Before & After post will be coming your way later this year. Excited to see how it compares to these crazy-realistic renderings? I’m excited for you, too. 😉
Until then, I’d love to hear… what kind of home are you living in? Does it still have funny quirks from decades past? Let’s hear it, y’all!
Xo,
E
P.S. Don’t forget to subscribe below to get our latest and prettiest blog posts delivered directly to your inbox. 😉


I love Mrs. C’s vision for her home and when a wall’s gotta go, a wall’s gotta go! Having lived in California my entire life, ranch homes are very familiar. A full basement is a rarity and nice bonus. I look forward to the final reveal! xo
You’re so right Juliet- for sure a great bonus!
Thanks for reading and sharing your thoughts- I can’t wait to to share the reveal as well!
This floor layout and description looks very similar to our home (1960s ranch) but I’m wondering what the sq footage for the main floor is for context. This is an amazing transformation!
Hi Barbara- thanks for reading and sending in a question. This ranch home is typical of those built in the 70’s, with all the bedrooms and main living areas upstairs, with a full basement downstairs. The upstairs, which is the part we remodeled, contains 3 bedrooms, 2 baths, family room, living/ dining, and kitchen. We changed up that floorplan so now it still contains the 3 bd/ 2 ba, but the kitchen and family room and living room are all essentially combined, and the dining room became a mega laundry room for this busy family with 3 boys. I’d guess the upstairs has around 1250 sf or so. Thanks so much for stopping by!